Full Stack On-Premise Deployment
In this flavor, the entire YepCode microservices and related services (database, identity provider, etc.) are deployed.
All the microservices are dockerized, and we may provide a Helm chart to deploy the entire stack in a Kubernetes cluster.
This deployment option is only available on ENTERPRISE plans, so please contact us if you are interested in this flavor.
Installation using Helm chart
Section titled “Installation using Helm chart”Prerequisites
Section titled “Prerequisites”Authenticate to helm repository
Section titled “Authenticate to helm repository”First of all, you need to authenticate with the Helm repository. You need the shared secret to access docker images and helm charts. Run following command replacing the secret file path:
HELM_SECRET=$(docker run --rm -ti \-v "<shared_secret_location>":/tmp/sa.base64 google/cloud-sdk:alpine \bash -c "base64 -d /tmp/sa.base64 > /tmp/sa.json;gcloud auth login --cred-file=/tmp/sa.json --project yepcode 2>/dev/null;gcloud auth print-access-token")
echo $HELM_SECRET | helm registry login -u oauth2accesstoken --password-stdin europe-docker.pkg.dev
Create redis database
Section titled “Create redis database”Redis user is required with the following permissions:
+get +set +del +scan +info +selectBy default, key prefix yc::core:: is used.
Add initial mongodb data
Section titled “Add initial mongodb data”You need 2 users:
- One with permission to create new databases (admin)
- Another with permission to read/write in the main database
Then, follow these steps:
- Grant permissions to users:
Important: This section assumes that the database names are yepcode-prod and yepcode-prod-<team>.
db.grantRolesToUser(<admin-username>, [{ "db": "yepcode-prod", "role": "readWrite"}]);db.grantRolesToUser(<non-admin-username>, [{ "db": "yepcode-prod", "role": "readWrite"}]);db.grantRolesToUser(<non-admin-username>, [{ "db": "yepcode-prod-yepcode-on-prem", "role": "readWrite"}]);db.grantRolesToUser(<non-admin-username>, [{ "db": "yepcode-prod-sandbox", "role": "readWrite"}]);- Create initial team documents:
See file insert-teams.js
- Insert
default dependenciesdocuments:
See file insert-dependencies.js
Install keycloak
Section titled “Install keycloak”See changelog for Keycloak stack
- Create a file
values.yepcode-keycloak-prod.yamland update the values:
yepcode:  domain: demo.yepcode.io
keycloak:  domain: auth-demo.yepcode.io # keycloak domain. Can be the same used in yepcode  db:    url: "jdbc:postgresql://host/db-name"    username: yepcode-keycloak-demo    password: "" # postgres password, secret  ui:    password: "" # Create a new password for the admin user, secret
imageCredentials:  password: "<shared secret>" # secret
aws: enabled: true # enable AWS specific configurations ingress: annotations: kubernetes.io/ingress.class: alb alb.ingress.kubernetes.io/listen-ports: '[{"HTTP": 80}, {"HTTPS": 443}]' alb.ingress.kubernetes.io/ssl-redirect: '443' alb.ingress.kubernetes.io/certificate-arn: '<subnets1certificateArn>' alb.ingress.kubernetes.io/target-type: ip alb.ingress.kubernetes.io/load-balancer-name: '<loadBalancerName>' alb.ingress.kubernetes.io/group.name: '<ingressGroup>' alb.ingress.kubernetes.io/group.order: '0' alb.ingress.kubernetes.io/scheme: internet-facing alb.ingress.kubernetes.io/subnets: '<subnets1,subnet2>'- We can now install Keycloak using the following command. This will install Keycloak in the
yepcode-keycloaknamespace.keycloak.initialImport=truewill automatically import yepcode realm:
helm install yepcode-keycloak \ oci://europe-docker.pkg.dev/yepcode/helm-on-premise/yepcode-keycloak \ --version 1.10.7 \ --set keycloak.initialImport=true \ -n yepcode-keycloak \ -f values.yepcode-keycloak-prod.yamlThen, go to the Keycloak URL (https://keycloak.domain/auth) and login with the admin user and open yepcode realm:
- In
Realm settings->Email tabyou must setup the SMTP configuration. - In
Userssection, create a new user and assign theyepcode-on-premandsandboxgroups to it:
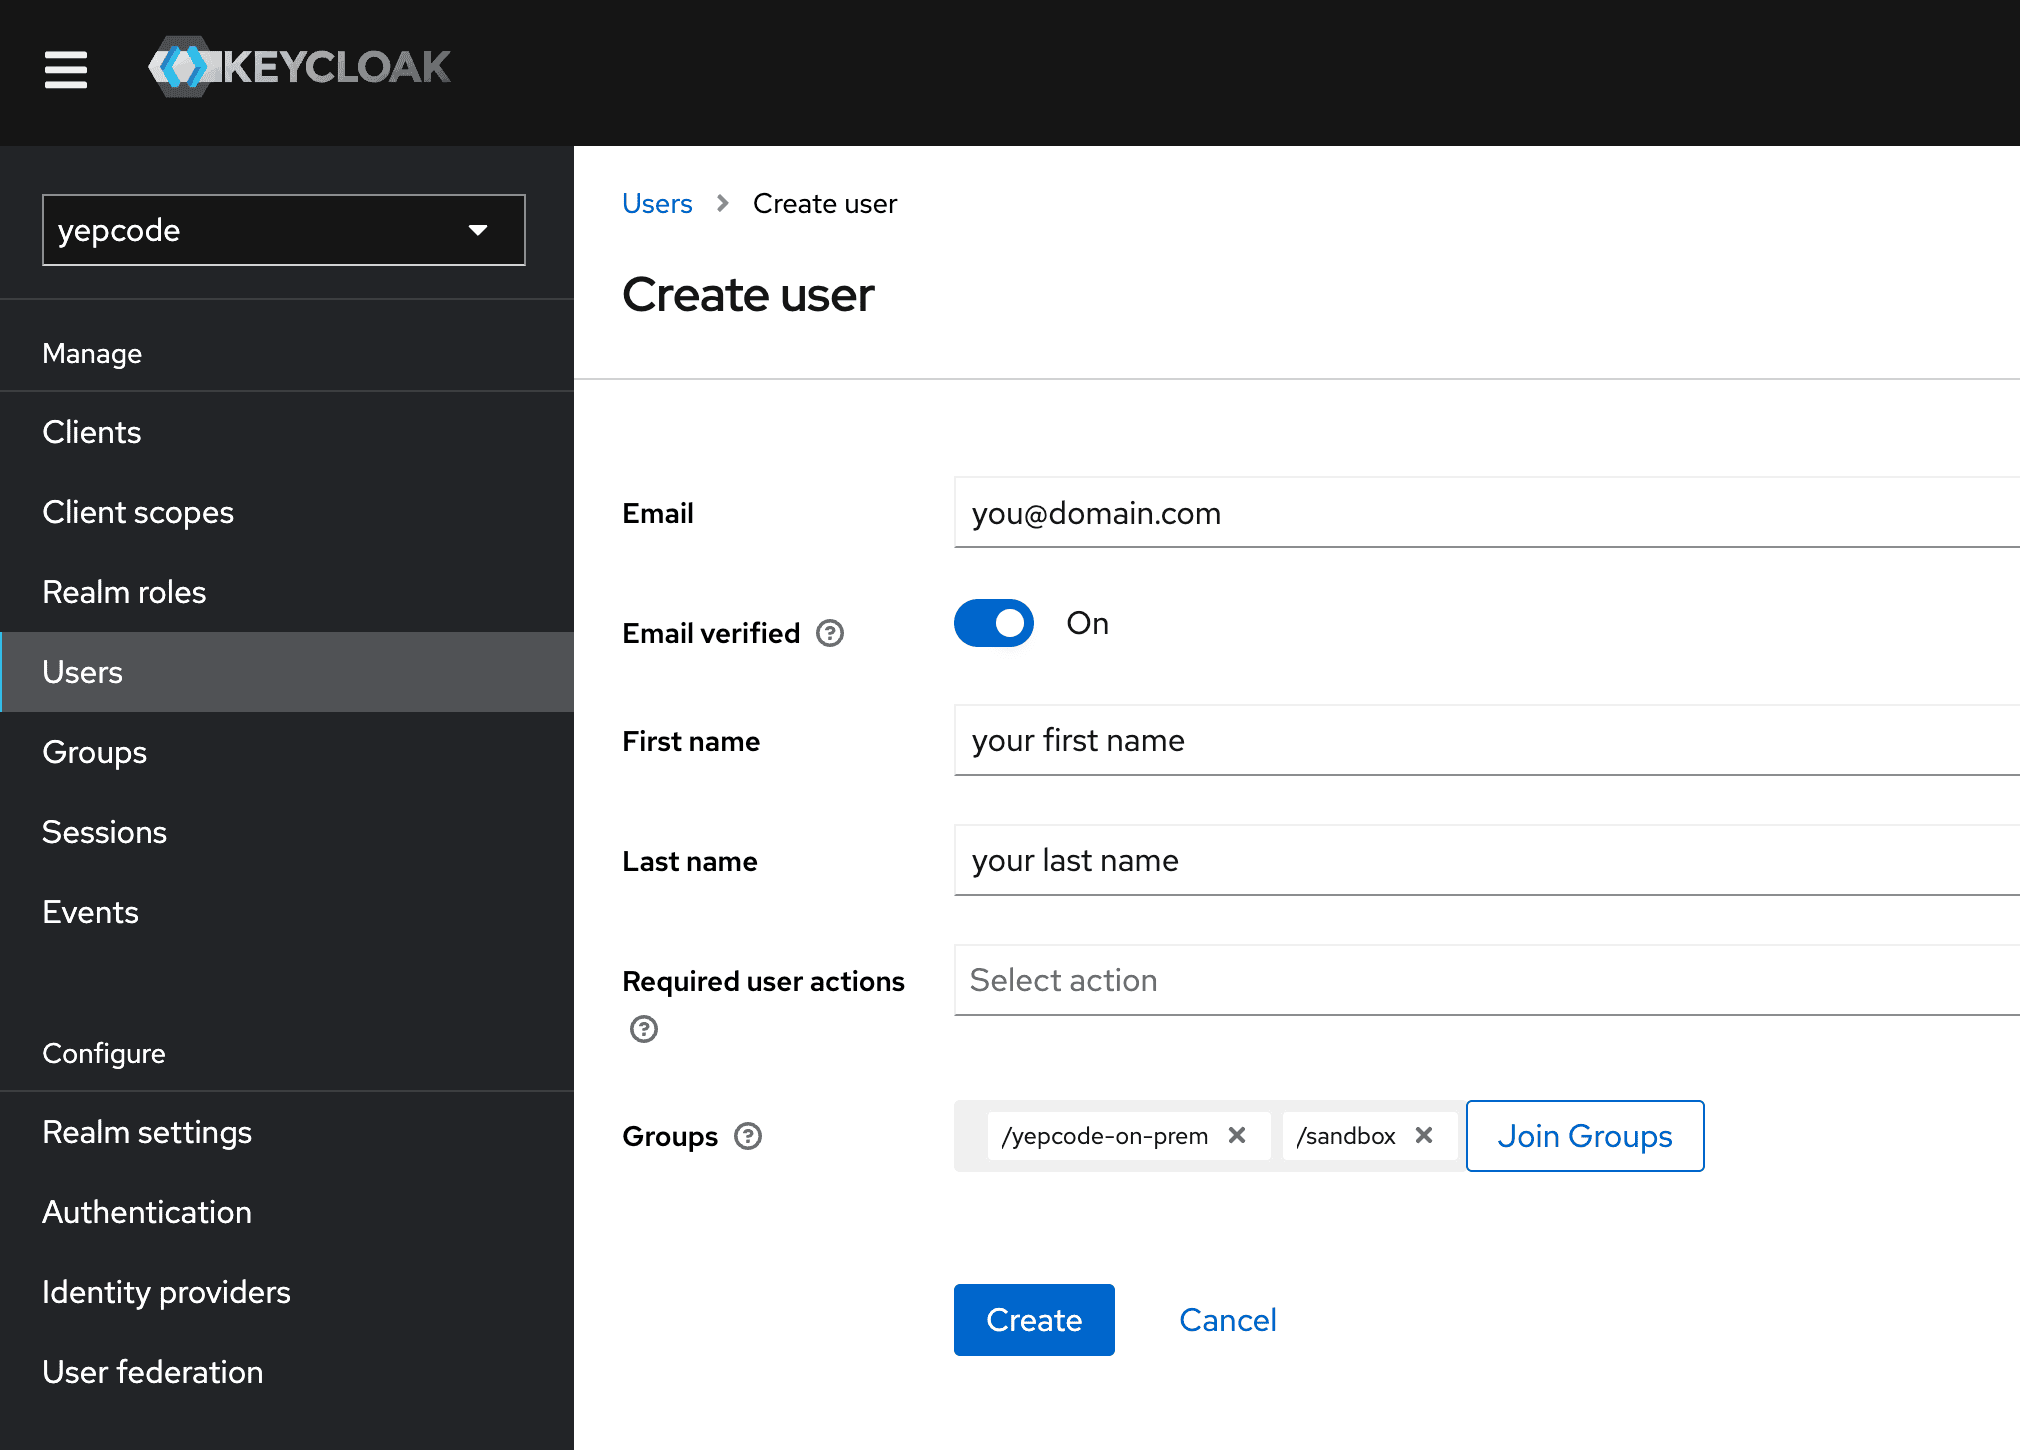
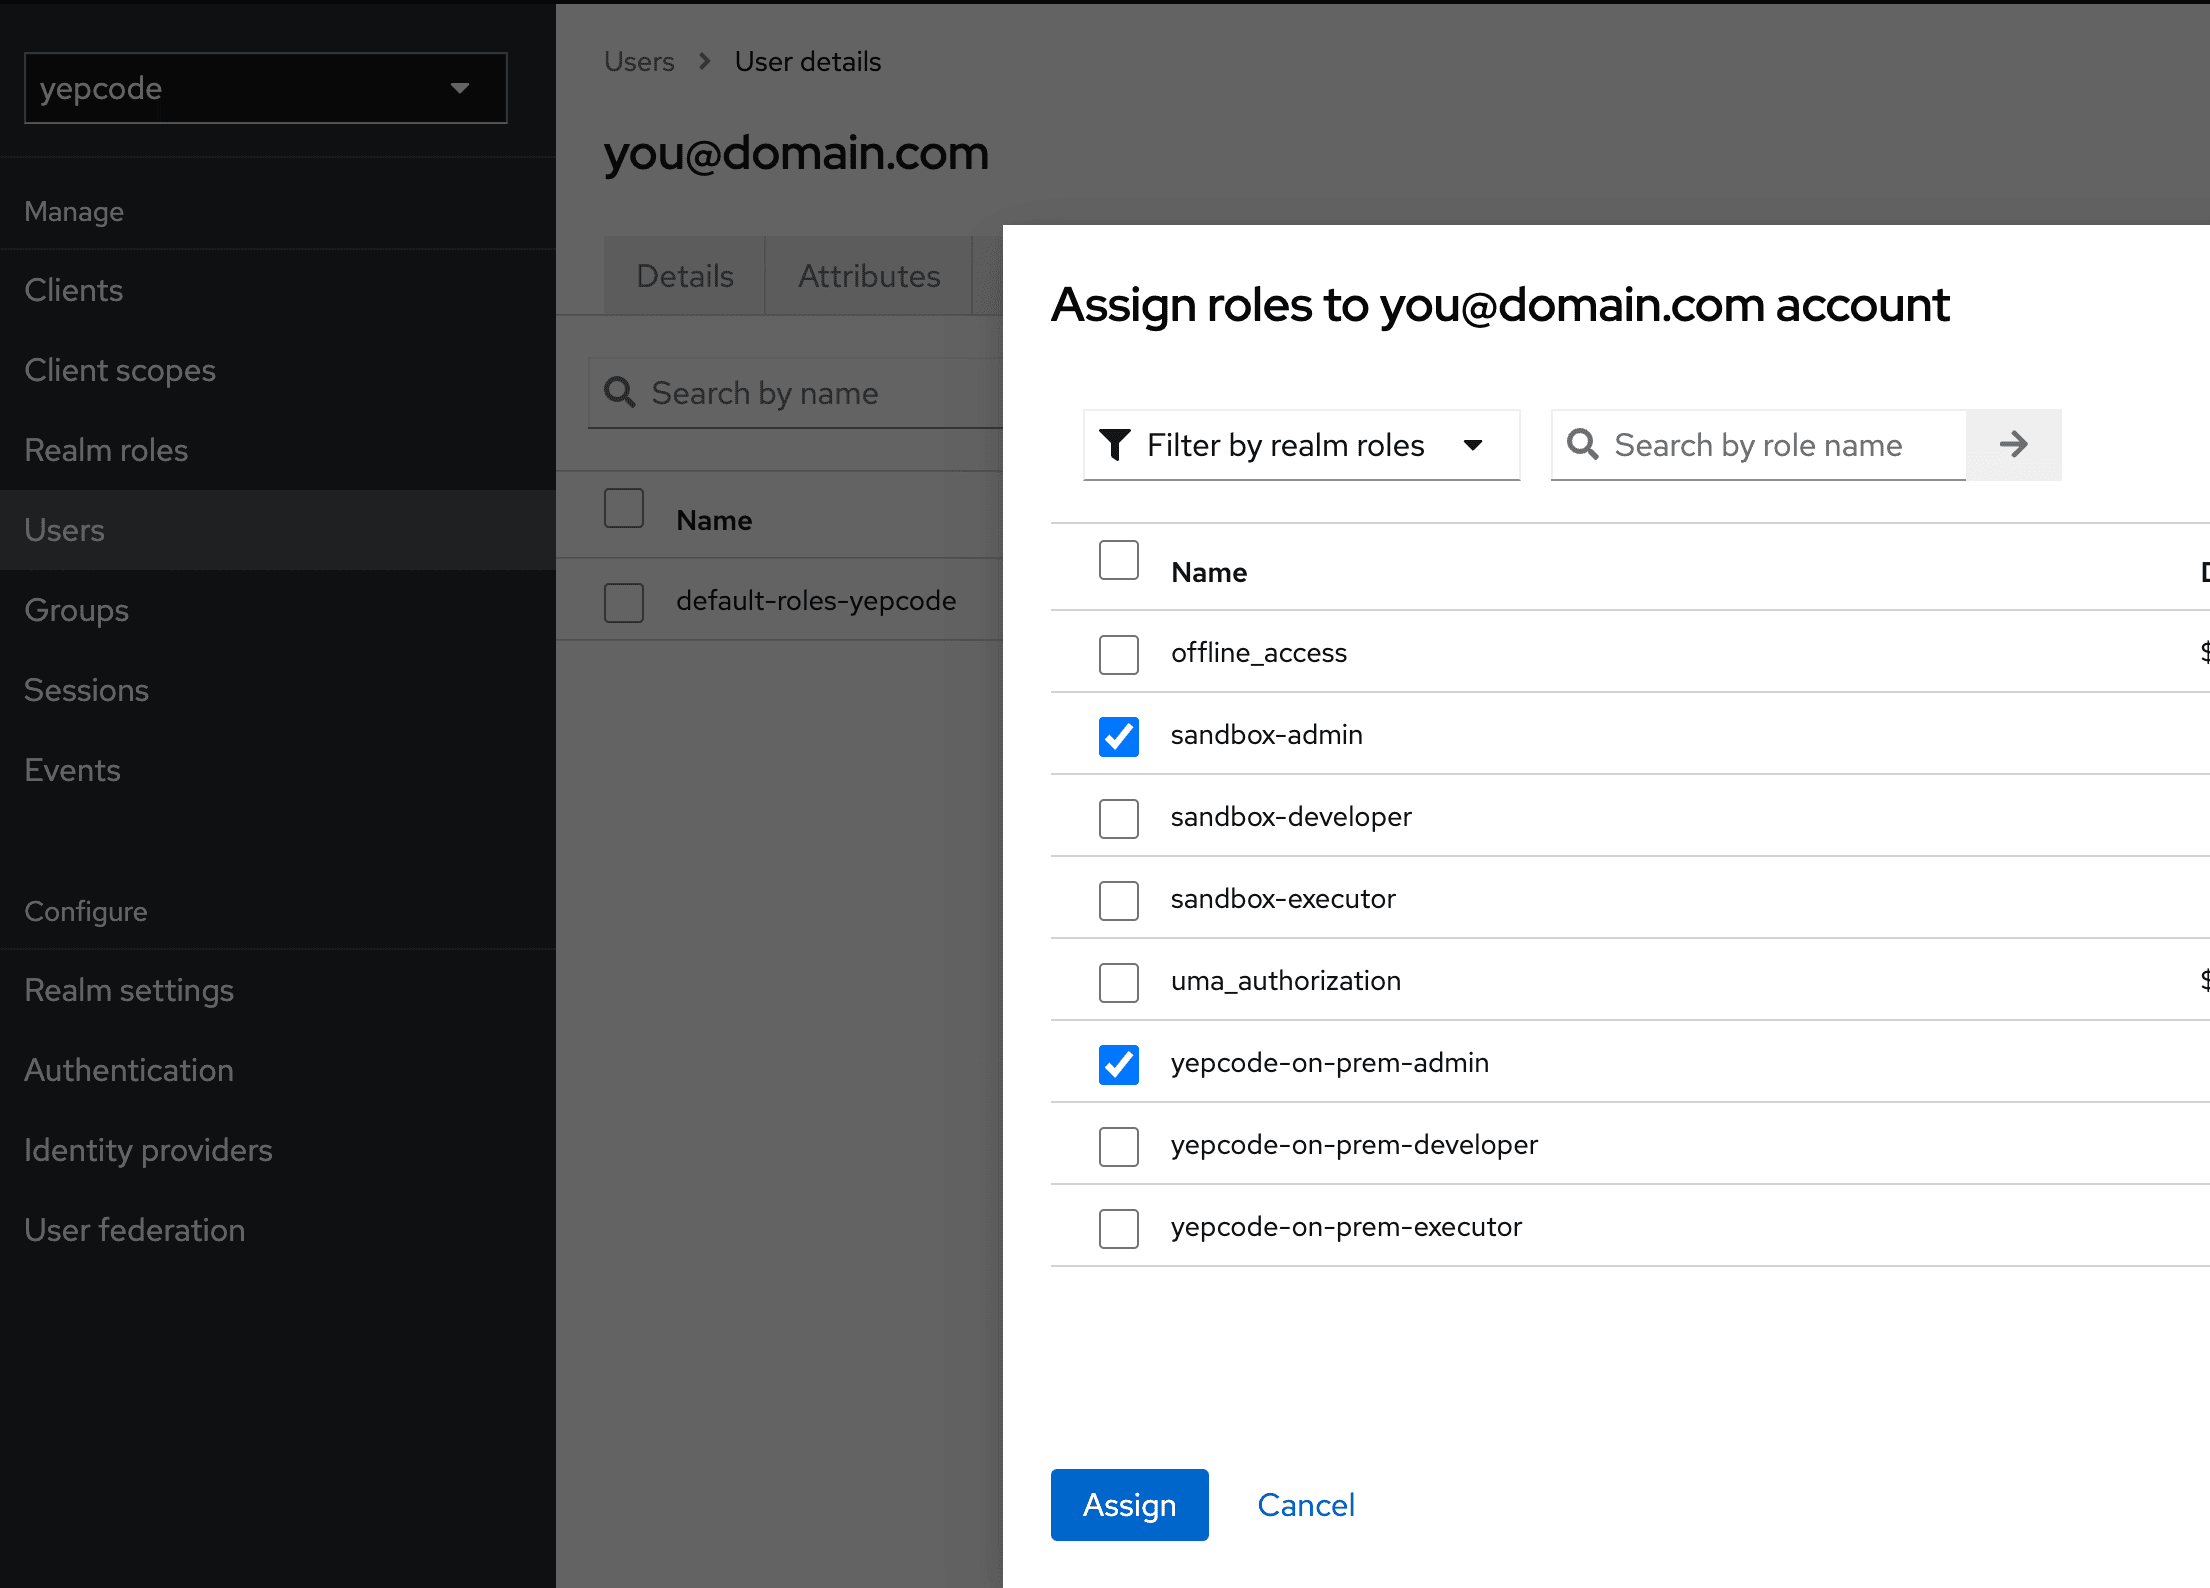
- Add roles
yepcode-on-prem-adminandsandbox-adminto the user.
-
Go to
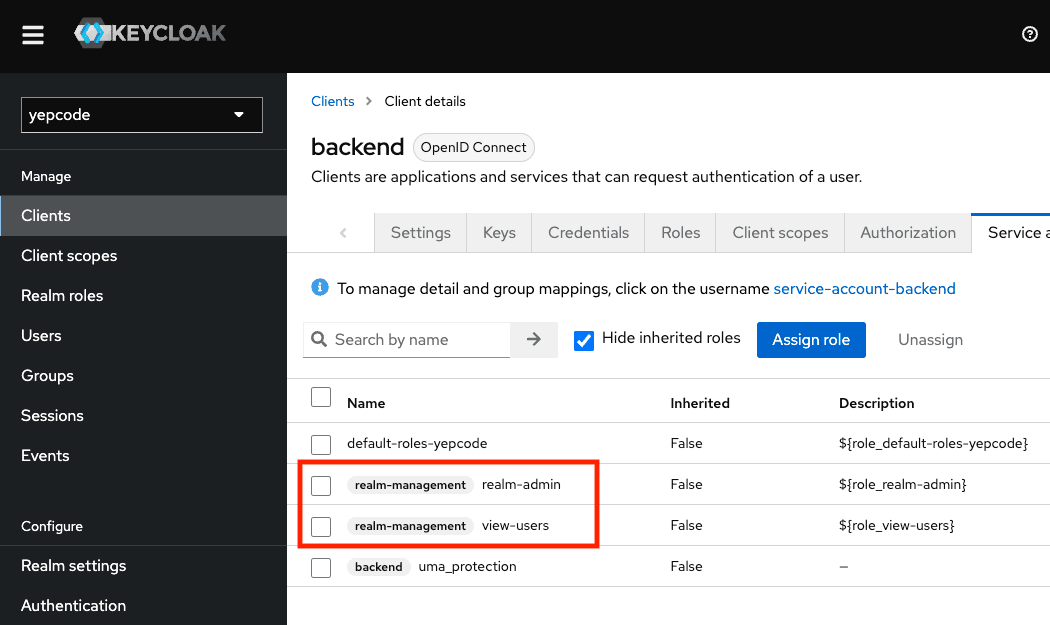
Clients->backend->Credentialsand copy theSecretvalue. This will be used in the next section. -
Go to
Clients->backend->Service Account Rolesand ensure that(realm-management) realm-adminand(realm-management) view-usersroles are assigned.
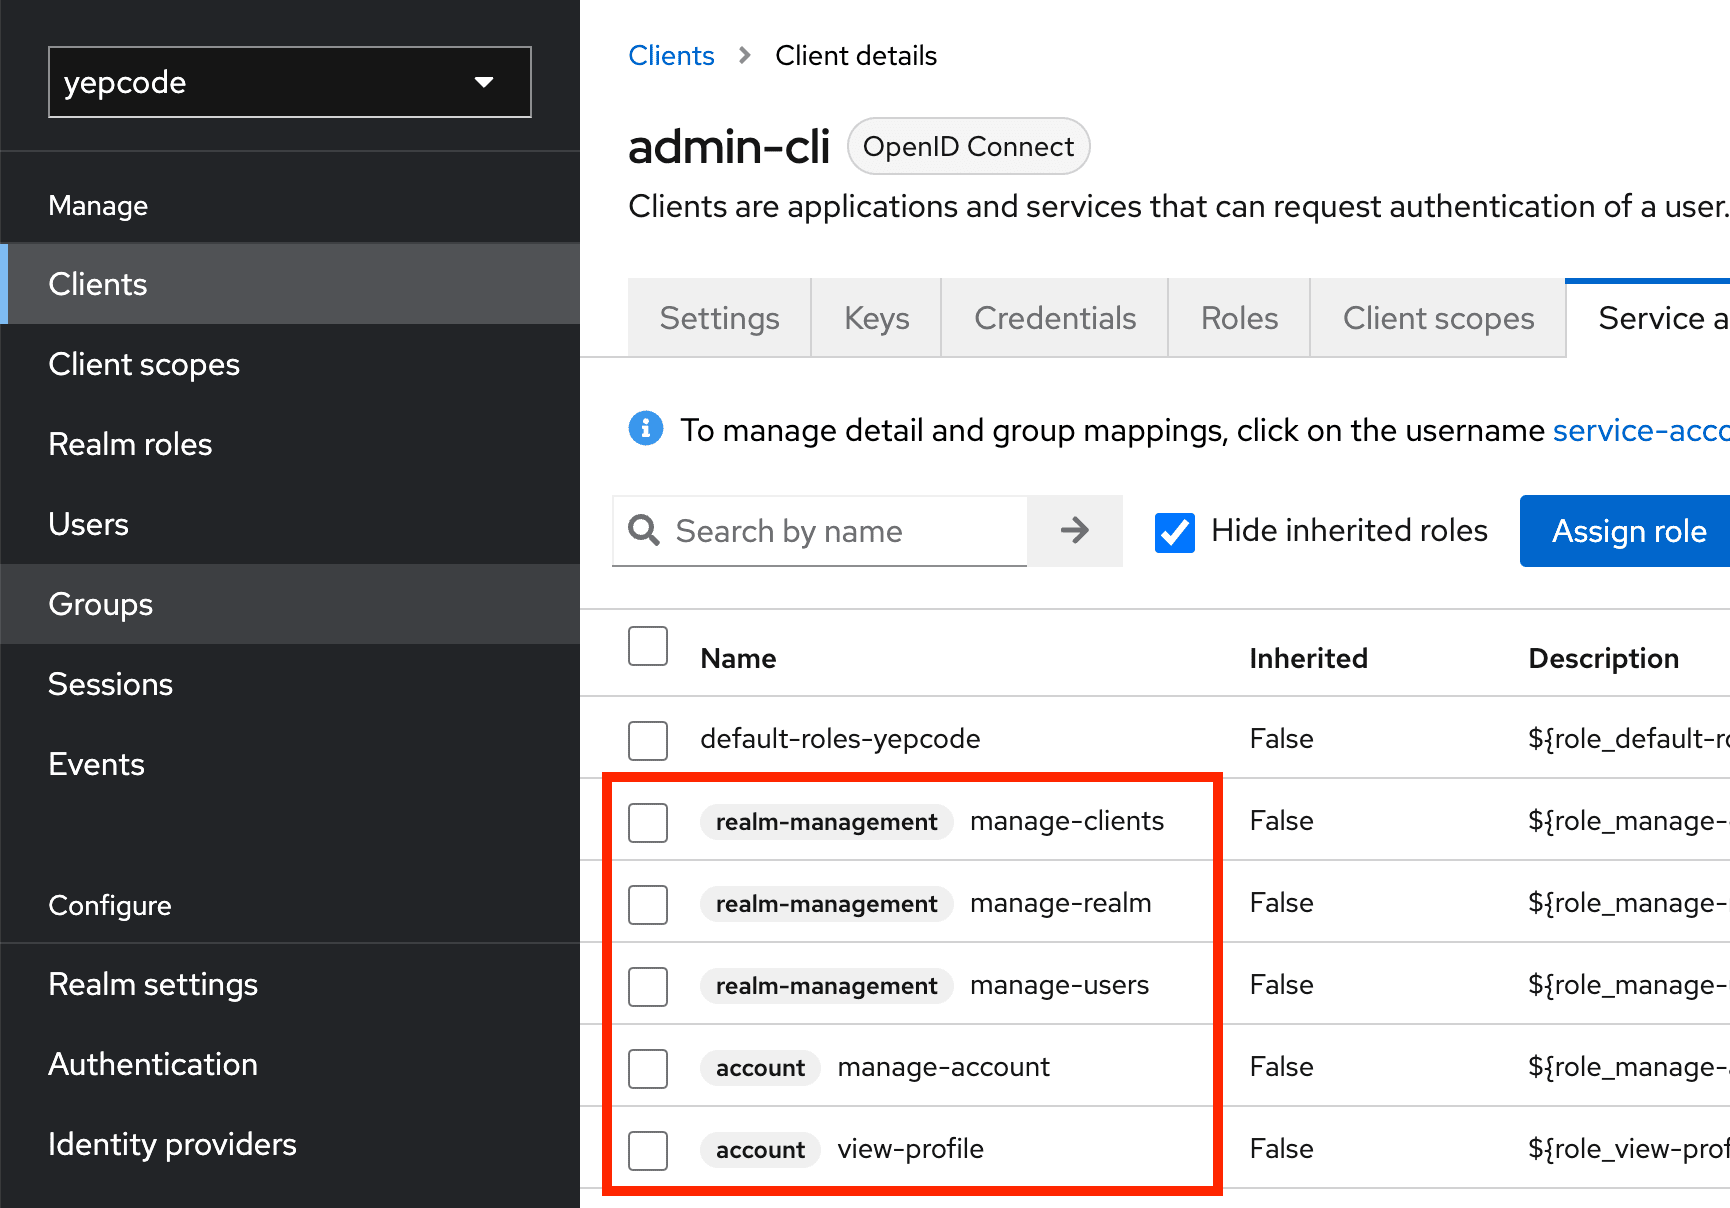
- Go to
Clients->admin-cli->Service Account Rolesand ensure that(realm-management) manage-realm,(realm-management) manage-clients,(realm-management) manage-users,(account) manage-accountand(account) view-profileroles are assigned.
After that, upgrade the Keycloak chart to disable the initial import:
helm upgrade yepcode-keycloak \ oci://europe-docker.pkg.dev/yepcode/helm-on-premise/yepcode-keycloak \ --version 1.10.7 \ -n yepcode-keycloak \ -f values.yepcode-keycloak-prod.yamlInstall core stack
Section titled “Install core stack”See changelog for core stack
- Create a file
values.yepcode-stack-prod.yamland update the values:
yepcode:  domain: demo.yepcode.io  baseUrl: https://demo.yepcode.io  teamsInvite:    auth:      username: "select_an_username"      password: "select_a_password"  mongodb:    uri: "mongodb://user:pass@mongodb_host_01:27017,mongodb_host_02:27017/admin?&replicaSet=yepcode&maxIdleTimeMS=3600000&minPoolSize=4"    adminUri: "mongodb://admin_user:admin_pass@mongodb_host_01:27017,mongodb_host_02:27017/admin?&replicaSet=yepcode&maxIdleTimeMS=3600000&minPoolSize=1"    encryptionSalt: 1234567890abcdef # 16 hex characters    encryptionSecretKey: demo # any string    mainDb: yepcode-prod # main database name    tenantDbFormat: yepcode-prod-%s # team database name format#   grantRolesAfterDbCreation: true  rabbitmq:    uri: "amqps://user:pass@rabbitmq-host:5671/%2fyepcode_vhost" # rabbitmq uri  redis:#   enabled: true    host: ""#   port: "6379"#   database: "0"    username: ""    password: "" # secret#   ssl: false#   keyPrefix: "yc::core::"#   timeout: 1500#   connectTimeout: 15000#   pool:#     enabled: true#     maxActive: 50#     maxIdle: 10#     maxWait: 500  executionsWatchdog:    enabled: true    ignoredTeams: "" # comma separated list of teams to ignore#   maxInactiveSeconds: "190" # by default, marks as failed an execution not receiving pings for more than 3 minutes#   periodMs: "60000"

keycloak:  domain: auth-demo.yepcode.io  publicAuthUrl: https://auth-demo.yepcode.io/auth  privateAuthUrl: http://keycloak-http.yepcode-keycloak.svc.cluster.local/auth # internal keycloak url with namespace yepcode-keycloak  clientSecret: "" # backend client secret, copied from Keycloak in previous section
# Define CA or server certificates to import in java keystore, pem format in base64#certificates:#  sample-certificate: LS0tLS1CRUdJTiBDRVJUSUZJQ0FURS0tLS0t...
api:  replicaCount: 2
scheduler:  replicaCount: 1#  certificates: []
web:  replicaCount: 1#  certificates: []
engine:  replicaCount: 2#  certificates: # list of certificates to import in java keystore#    - sample-certificate
dependencies_checker:  replicaCount: 1
mcp_server_sse:  replicaCount: 0 # by default, disabled
externalServices:  sentry:    authToken: ""  posthog:    key: ""
imageCredentials:  password: "<shared secret>" # secret
license:  installationId: "" # use an unique id for your installation  cloudServicesAuth: "" # cloud services auth token
aws:  enabled: true  ingress:    annotations:      kubernetes.io/ingress.class: alb      alb.ingress.kubernetes.io/listen-ports: '[{"HTTP": 80}, {"HTTPS": 443}]'      alb.ingress.kubernetes.io/ssl-redirect: '443'      alb.ingress.kubernetes.io/certificate-arn: '<subnets1certificateArn>'      alb.ingress.kubernetes.io/target-type: ip      alb.ingress.kubernetes.io/load-balancer-name: '<loadBalancerName>'      alb.ingress.kubernetes.io/group.name: '<ingressGroup>'      alb.ingress.kubernetes.io/group.order: '1'      alb.ingress.kubernetes.io/scheme: internet-facing      alb.ingress.kubernetes.io/subnets: '<subnets1,subnet2>'
And then install the core stack in namespace yepcode-stack using the following command:
helm upgrade --install yepcode-stack \ oci://europe-docker.pkg.dev/yepcode/helm-on-premise/yepcode-stack \ --version 0.13.0 \ -n yepcode-stack \ -f values.yepcode-stack-prod.yamlInstall executors
Section titled “Install executors”See changelog for executors stack
- Create a file
values.yepcode-executors-prod.yamland update the values:
executor_manager:  license_token: "" # license token  rabbitmq_uri: "amqps://user:pass@rabbitmq-host:5671/%2fyepcode_vhost" # not used if license token is provided  encryption_salt: 1234567890abcdef # not used if license token is provided, 16 hex characters, same used in core stack  encryption_secret_key: demo # not used if license token is provided, any string, same used in core stack  # Next value is AmazonRootCA1.pem in base64  ca_certificate_base64: "LS0tLS1CRUdJTiBDRVJUSUZJQ0FURS0tLS0tCk1JSURRVENDQWltZ0F3SUJBZ0lUQm15Zno1bS9qQW81NHZCNGlrUG1salpieWpBTkJna3Foa2lHOXcwQkFRc0YKQURBNU1Rc3dDUVlEVlFRR0V3SlZVekVQTUEwR0ExVUVDaE1HUVcxaGVtOXVNUmt3RndZRFZRUURFeEJCYldGNgpiMjRnVW05dmRDQkRRU0F4TUI0WERURTFNRFV5TmpBd01EQXdNRm9YRFRNNE1ERXhOekF3TURBd01Gb3dPVEVMCk1Ba0dBMVVFQmhNQ1ZWTXhEekFOQmdOVkJBb1RCa0Z0WVhwdmJqRVpNQmNHQTFVRUF4TVFRVzFoZW05dUlGSnYKYjNRZ1EwRWdNVENDQVNJd0RRWUpLb1pJaHZjTkFRRUJCUUFEZ2dFUEFEQ0NBUW9DZ2dFQkFMSjRnSEhLZU5YagpjYTlIZ0ZCMGZXN1kxNGgyOUpsbzkxZ2hZUGwwaEFFdnJBSXRodE9nUTNwT3NxVFFOcm9Cdm8zYlNNZ0hGelpNCjlPNklJOGMrNnpmMXRSbjRTV2l3M3RlNWRqZ2RZWjZrL29JMnBlVktWdVJGNGZuOXRCYjZkTnFjbXpVNUwvcXcKSUZBR2JIclFnTEttK2Evc1J4bVBVRGdIM0tLSE9WajR1dFdwK1Vobk1KYnVsSGhlYjRtalVjQXdobWFoUldhNgpWT3VqdzVINVNOei8wZWd3TFgwdGRIQTExNGdrOTU3RVdXNjdjNGNYOGpKR0tMaEQrcmNkcXNxMDhwOGtEaTFMCjkzRmNYbW4vNnBVQ3l6aUtybEE0Yjl2N0xXSWJ4Y2NlVk9GMzRHZklENXlISTlZL1FDQi9JSURFZ0V3K095UW0KamdTdWJKcklxZzBDQXdFQUFhTkNNRUF3RHdZRFZSMFRBUUgvQkFVd0F3RUIvekFPQmdOVkhROEJBZjhFQkFNQwpBWVl3SFFZRFZSME9CQllFRklRWXpJVTA3THdNbEpRdUNGbWN4N0lRVGdvSU1BMEdDU3FHU0liM0RRRUJDd1VBCkE0SUJBUUNZOGpkYVFaQ2hHc1YyVVNnZ05pTU9ydVlvdTZyNGxLNUlwREIvRy93a2pVdTB5S0dYOXJieGVuREkKVTVQTUNDamptQ1hQSTZUNTNpSFRmSVVKclU2YWRUckNDMnFKZUhaRVJ4aGxiSTFCamp0L21zdjB0YWRRMXdVcwpOK2dEUzYzcFlhQUNidlh5OE1XeTdWdTMzUHFVWEhlZUU2Vi9VcTJWOHZpVE85NkxYRnZLV2xKYllLOFU5MHZ2Cm8vdWZRSlZ0TVZUOFF0UEhSaDhqcmRrUFNIQ2EyWFY0Y2RGeVF6UjFibGRad2dKY0ptQXB6eU1aRm82SVE2WFUKNU1zSSt5TVJRK2hES1hKaW9hbGRYZ2pVa0s2NDJNNFV3dEJWOG9iMnhKTkRkMlpod0xub1FkZVhlR0FEYmtweQpycVhSZmJvUW5vWnNHNHE1V1RQNDY4U1F2dkc1Ci0tLS0tRU5EIENFUlRJRklDQVRFLS0tLS0K"
executor_agent:  replicaCount: 1
shared_storage:# shared_storage is used to create a persistent volume to storage execution dependencies,# it requires an available nfs server. Only required if dependencies manager is enabled.  nfs:    capacity: 15Gi    server: "" # ip address    path: "" # path in nfs server  mountOptions: []
executor_dependencies_manager:  # mode: 'deployed', 'external' or 'none'  #     - deployed: deploys a dependency manager microservice in the cluster  #     - external: uses an external dependency manager. Recomended if you want to deploy  #                 the dependency manager in the same server as the nfs server (faster )  #     - none: YepCloud default dependencies are used, shared storage is not used  # Important! If dependencies manager is enabled, add `CUSTOM_DEPENDENCIES` feature  #            to the team to allow changing dependencies (enabledFeatues in team DB collection)  mode: 'none'#  external:#    host: '1.2.3.4'#    port: '3000'
# If 'forceDependenciesPermissions' is enabled then container is run as root,# it changes permissions on dependencies mount point to user 1000 and then it runs# dependencies manager as user 1000#  forceDependenciesPermissions: "true"
# With 'forceDependenciesPermissionsDeep' enabled, dependencies permission change# is done recursively. NOTE this can take a lot of time with thousands of files#  forceDependenciesPermissionsDeep: "false"
#affinity:#  nodeAffinity:#    requiredDuringSchedulingIgnoredDuringExecution:#      nodeSelectorTerms:#        - matchExpressions:#            - key: yepcode/prod#              operator: In#              values:#                - 'true'#tolerations:#  - effect: NoSchedule#    key: environment#    operator: Equal#    value: prod#runtimeClassName: gvisor
imageCredentials:  password: "<shared secret>" # secret
#extraImagePullSecrets: # if you are using a private registry. A secret must be created in the cluster.#  - name: my-existing-image-pull-secret
And then install the executors in namespace yepcode-executors using the following command:
helm upgrade --install yepcode-executors \ oci://europe-docker.pkg.dev/yepcode/helm-executors/yepcode-executors \ --version 0.13.0 \ -n yepcode-executors \ -f values.yepcode-executors-prod.yamlCore processes installation
Section titled “Core processes installation”You have to add some core processes in yepcode-on-prem team.
Processes
Section titled “Processes”# Install last version of cli with:npm install -g @yepcode/cli
YEPCODE_DOMAIN=<your installation domain>KEYCLOAK_DOMAIN=<keycloak domain>
# If same domain is used for yepcode and keycloak:yepcode login -u https://${YEPCODE_DOMAIN}# If not, then login using `-a` option:## yepcode login -u https://${YEPCODE_DOMAIN} -a https://${KEYCLOAK_DOMAIN}/auth/realms/yepcode
yepcode clone https://${YEPCODE_DOMAIN}/yepcode-on-premcd yepcode-on-premtar xzf ~/Downloads/yepcode-on-prem_2024-07-15.tar.gzyepcode remote:add https://${YEPCODE_DOMAIN}/yepcode-on-premyepcode addyepcode pushAt the moment some manual variables, credentials, webhooks and schedules creation is required:
Variables
Section titled “Variables”Open Variables section in YepCode UI and change values for your installation.
Credentials
Section titled “Credentials”Prerequisites:
- Create
rootrole if it does not exists. - Create an user in
yepcoderealm and add it to roleroot. This user will be used in some internal processes to operate with keycloak realm.
Then, open Credentials section and update their configuration.
Webhooks
Section titled “Webhooks”Add webhooks to the following processes:
| Process | Username | Password |
|---|---|---|
| Core - Invite member | <value in chart: yepcode.teamsInvite.auth.username> | <value in chart: yepcode.teamsInvite.auth.password> |
Schedules
Section titled “Schedules”| Name | Cron | Schedule | Allow concurrent executions | Parameters | Comment |
|---|---|---|---|---|---|
| Core - Update monthly team stats | 1 0 1 * * | At 12:01 AM, on day 1 of the month | YES | ||
| DevOps - Alert delayed executions | 15 0/12 * * * | At 15 minutes past the hour, every 12 hours | NO | hours: 12 | |
| Core - Monitor Scheduler | * * * * * | Every minute | NO | Enable if MONITOR_SCHEDULER_HEARTBEAT_URL is set | |
| DevOps - Alert idle executions | 33 0/3 * * * | At 33 minutes past the hour, every 3 hours | NO | ||
| Core - Remove execution history | 0 2 * * * | At 02:00 AM | NO |
Configuration
Section titled “Configuration”Configure YepCode datastore (Redis)
Section titled “Configure YepCode datastore (Redis)”Rigth now, datastore configuration is not available in web ui, so you need to update the datastore configuration in mongodb database.
First of all, you need to enable DATASTORE feature for each team. Open YepCode mongodb main database and find the team document:
db.getCollection("teams").find({_id: "yepcode-on-prem"})Then add the value DATASTORE to billingPlan.enabledFeatures array
{ "_id" : "yepcode-on-prem", ... "billingPlan" : { "enabledFeatures" : [ ..., "DATASTORE" ] }}Finally update the datastore configuration in the team document.
Note: To encrypt DB secrets, see this section.
{ "_id" : "yepcode-on-prem", ... "settings" : { "executionSettings" : { "datastoreConfig" : { "url" : "redis://@redis_host:6379", "user" : "prod-yepcode", "password" : { "value" : "<password encrypted with DB encryptor>" }, "keyPrefix" : "prod:team:yepcode-on-prem" } }}